Sewing Buttons on Your Sweaters
If you watch the podcast, you have almost definitely heard me say that I hate buttons on my knits. The main reason why is because I've always had so much trouble sewing on buttons that actually STAY on without distorting the fabric of the sweater.
Want to know a secret? During the photoshoot for our Athleisure Collection, one of the buttons on Marsha's Pride actually popped off. For each photo, we had to lay it on the sweater where it belonged to hide this, and Jen discovered my secret. I'm totally rubbish at anything sewing related.
Jen and I often say that you are bad at things until you're good at them, and all of the hard craft things just take practice. It's all true. So I have been practicing what I preach this summer and tackling all of the things I don't usually like doing. Including learning to sew buttons properly. It turns out I just needed a friend to show me, so now I get to show you!

Step One: Acquire buttons and make a plan
Lately, I've designed several garments that include at least one button. And most recently, one of my Fall designs is a button front cardigan. Due to an unfortunate flooding of my apartment in Brooklyn several years ago, I have zero button stash in my craft room today. So the first step in designing this cardigan was to find some buttons.
Typically, a pattern tells you what size buttons you need. That makes it fairly easy to look for buttons as you can search for them by size. I have found that the internet seems to be a veritable treasure trove of button options. I'll have to report back when I find my new favorite resources, so please stay tuned.
I ordered some beautiful blue and copper buttons from Etsy which were the right size. I will add, Joann's is a wonderful resource for simple buttons which I have often used here in the US. If you, like me, have a more minimalist aesthetic for buttons, this is a great place to find them.
One of Jen's best pieces of button advice was to begin my button collection again. She says "You can never use the buttons you bought for your sweater. You have to buy buttons for the sweater, add them to your collection, and then find better buttons that you already had in your collection."
So following Jen's advice, I flew to Pittsburgh with my sweater sans buttons and found the perfect ones in her stash. She even let me keep the ones I purchased to start my own button collection.

The buttons I purchased, not the buttons I chose to use, but aren't they cute?
Step Two: Get your thread and begin
Once you've threaded your needle with regular sewing thread that closely matches your sweater or your buttons, or the aesthetic you're looking for, you can begin sewing.
Lay your garment flat on a table and carefully align the two sides of the button band to place your buttons. You can use removable stitch markers to mark the placement of each button. Count the stitches between buttonholes and match that number of stitches between your buttons to make sure they are even.
Step Three: More times than you think
Go through the holes on your button more times than you think you need to. Ideally you will pass through each hole seven or eight times, perhaps even more, so that the buttons feel extremely secure.
Tie a knot with the remaining thread, but don't cut it yet.
Step Four: Jen's secret weaving method
I'm sure Jen didn't invent this, but I have also never seen it before bestie showed me so I'm calling it hers. After sewing your button on, you're going to create a little woven patch behind it to stabilize your button and make sure it's not going anywhere.
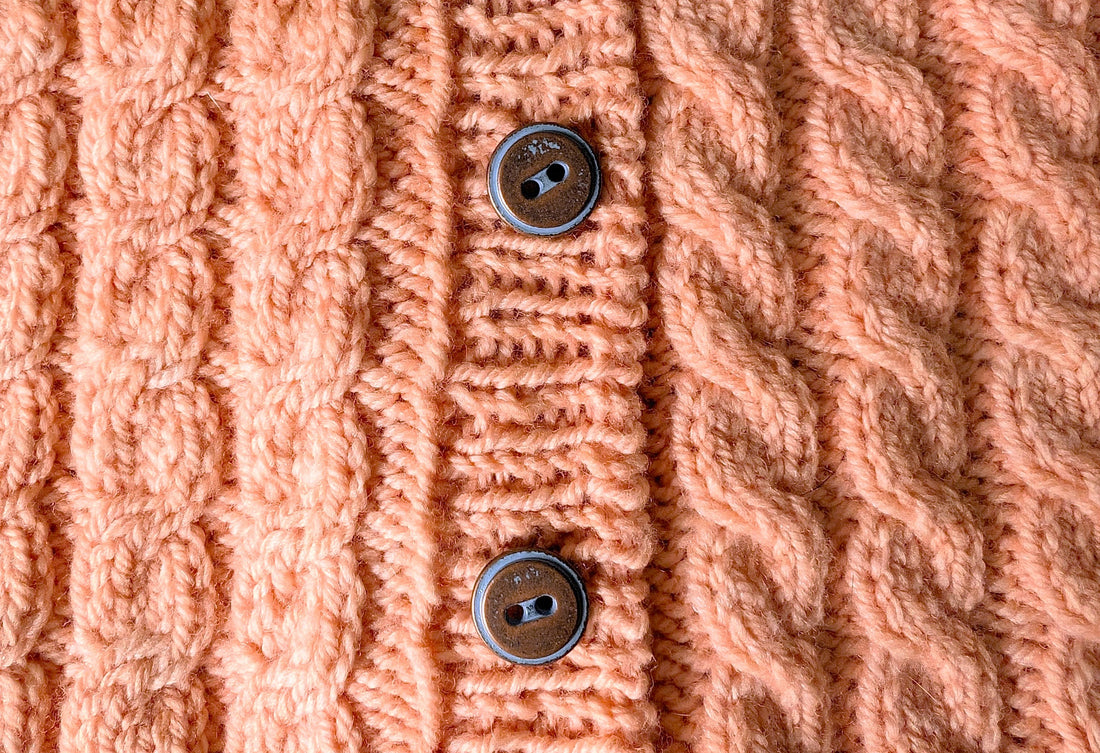
Use your needle and weave in and out of stitches behind your button, almost as if you are darning. Weave the needle through the exposed threads you are creating. It doesn't have to be beautiful, but be mindful you are not distorting the front of the fabric. See the image below of my woven button backs.
Once you're satisfied with your little woven patch, tie a knot and weave in the ends. Repeat for each button!
I'm so glad I asked Jen for help with this sweater. No matter how long you've been crafting, you have something to learn from other fiber artists and makers. Do you have a favorite button trick? Please leave a comment and share it!
PS - an honorable mention for everyone who suggested a small piece of felt sewn to the opposite side of the fabric from the button. I haven't tried this trick but it sounds like a great way to stabilize without distorting the fabric.

Paywall-free educational content like this has been paid for by Ko-fi supporters. Ko-fi members contribute to community resources like this one because they believe in our mission of creating smart makers who can dismantle oppressive systems of fast fashion and the patriarchy from our craft rooms. You can find out more about Ko-fi or become a supporter here.
1 comment
QPYwVgIEm